Friday 30 December 2011

Personalise my Bath

Ohhhh Xmas is over...
All our guests have left, and piles of laundry are mounting up in our utility room.
 A mountain of towels, I don't know which ones are clean, used and who's.

In our household, we often tend to get all our towels mixed up.
Most of them are just plain white (which I love), so we all end up having the same looking towel, and when bath time comes round, it's an endless mix-up.

So I made Nina, her very own

Name Tag Towel


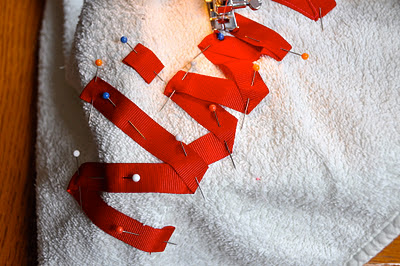
I took some bright red ribbon and "wrote" out her name on the towel, securing the ribbon with pins as I went along...

I sewed the edges of the ribbon, trying not to overlap an area too much. It took a little working out to see which sewing "journey" will take you round the ribbon without overlapping yourself too much, but once worked out, it's the easiest sewing project EVER.


And here it is... never to be mistaken for Daddy's towel now!!!


Love it!
Makes me chuckle...

I suppose now I need to make one each for the rest of us... maybe a slightly "smaller" name tag?
More appropriate :-)

Friday 23 December 2011

Making Foodie Videos

We're almost there Ladies and Gentlemen...


Xmas this year seems to be ALL about food.

Stirring.
Whipping.
Crushing.
Stuffing.
Tasting.
Roasting.

From Gordon Ramsey to Jamie Oliver, from Mary Berry to Delia Smith
everyone is teaching us how to cook the BEST Xmas dinner.

Here are a selection of foodie vidoes to inspire you and make you run into your kitchen wanting to cook, bake, make something yummy!

Nothing Xmassy, just food for foods' sake!

As a film maker... I can also appreciate the beauty of how these video recipes were made.

Just gorgeous.

Love this video and easy recipe for
BUTTER


And this fabulously, romantic
Gradient Cake
Gradient Cake from Gabriel Rodriguez


My New Roots
HOW TO MAKE NUT MILK

HOW TO COOK QUINOA

Ofelia's
RED VELVET CAKE


Just beautifully filmed food videos.
Totally inspiring... I'm heading to the kitchen right now!!!
And I'm bringing my camera with me...
Watch this space.

Tuesday 20 December 2011

A Coat for a Wooden Hanger

Rather a few days have gone by since my last post...

I celebrated a birthday (28... again :-)... )
Luca performed in his end of term nativity show (a Page - dressed vaguely like a Bell Boy).
Finished school until next year... and is now missing "his mates" - as he wailed tonight, in floods of tears.
And the mad xmas rush of final purchases, home made presents, baking and family hoverings is all coming together... and knackering me out!

So... time for some mindless, aesthetic crafting.
Food for the soul.

I have always loved little wooden hangers covered in woolly, knitted or crocheted jackets.
I remember my granny (Nonna) having them... and if only I'd been more interested in thrifting and granny vintage back when I was 20 (when she sadly passed away), I would've coveted all her wooden hangers, clothes, shoes, trinkets, kitchenalia, button collection, sewing machine etc... in fact, her whole house (looking back on it now) would've been a massive vintage flea market.

So...
Reminiscent of this bygone era, I have decided to crochet my own

Wooden Hanger Jackets


Here is how I did my first one (UK stitches):

(please check the width of your coat hanger, this pattern fitted around my wooden coat hanger nicely, but you may have to chain more or less stitches at the start, depending on the width of your hanger)


CH 10.
SS into first chain, to form a circle.
*CH 2 to form the first stitch.
TC 10 more stitches in every chain (11 stitches total, incl CH).
SS into top of first CH**.
Don't turn.
Repeat from * to **

When you are finished (amount of rows depend on the length of your hanger), un-screw the metal "hook" off the wooden hanger, slide the crochet "sausage" onto the hanger, re-screw the metal hook back in it's place.


Sew the ends together, with the same colour yarn (I actually left enough yarn at the beginning of the "sausage" and at the end and just used this to sew the ends in together).

And that's that!!!


I suppose you could use any stitch you wanted. I used a Treble this time, but may try a Half Treble or a Double next time, to make it all a little tighter.
Here I also used a 3mm hook, but you could use a smaller one to make the stitches tighter...

Such fun...

I have also knitted some wooden hanger "jackets", which look lovely, but it takes me twice as long to knit than to crochet, so I have gone back to my Hook.

Thursday 15 December 2011

A Little Award

Fellow blogger and friend Lorna, who writes such a beautiful green living blog


has awarded For My Girl Nina
a Liebster award


So happy!
Thank you thank you thank you
My first award (hopefully not the last)... to spread the word and support each others blogs.
Great idea!

The Liebster award is intended to bring more attention to blogs with fewer than 200 followers (I've cheated a little and have made this figure 500, as there are a couple of blogs out there, which are AMAZING and just over the "limit")

There are rules in accepting the award.
1. Copy and paste the award on your blog.
2. Thank the giver and link back to them.
3. Choose five blogs (I've chosen 6, as I couldn't make up my mind) which you would like to pass the award onto and let them know by leaving a comment on their blog.

So... I'd like to pass the award to:

Hart + Sew
My Sparkle
 Three Red Apples
Mimi and Tilly
Otillie's Closet
Sew She Sews

These are all fabulous blogs, which are inspiring, creative and beautiful.

Keep blogging ladies...

xxx

Monday 12 December 2011

Mini Bunting

Nina is almost 3 months old (on thursday).
I felt it was time to put down some "landmark moments", so I remember what she was "doing" at such a tiny age.

* She now smiles all the time, at anything and everything... a gorgeous hearty smile that brightens up my day.
* She did her first proper giggle, in the kitchen, with all of us witnessing the cute chuckle. We are all waiting patiently for the next giggle to come along...
* She is starting to teeth (early it seems), as she constantly bites her hands, is a little cranky and finds relief in a grown-up finger firmly lodged on her gums (I've just bought her an amber necklace, as I hear that can aid the teething process?).
* She has grown out of her Newborn clothes and is a little ball of roundness.
* Her favourite person is her big brother!!!
* She holds her head up quite steadily.
* When on her tummy, she is able to hold up her head and shoulders for a few minutes.
* She adores taking a bath and could stay in one for hours...
* She can stay awake for about an hour before she yawns and wants to go back to bed (takes after her mummy - and her daddy for that matter :-)

As this is a day for "mini celebrations", I have made some
                                  
 \/\/\/ Mini Bunting \/\/\/


Shamelessly stolen from my friend and fellow crafter Polly (who is an amazingly creative person, always full of fabulous ideas), who recently had a stall at a local Christmas Market here in Hastings, and she used mini bunting to decorate her table.

The bunting triangles are made of felt (so they don't need sewing, and they don't fray - yiiiippiiii), 


and I attached them all together with some bias binding.
So simple to make and totally effective.


Can't wait to get Nina's room sorted, so I can hang this pretty bunting properly...
Luca will be getting some too!!!

Wednesday 7 December 2011

White Chocolate Rocky Road

Luca's School Xmas Fair is creeping up on us, this Friday.
It will be our first Christmas Fair, and as I have no real knowledge of what goes on at one of these events, I have asked some more experienced mums...
Games, raffles, cake, mulled wine, face painting, Santa's Grotto and more seems to be the answer.

We have been asked (for who ever fancies it) to produce some cakes/pastries/sweets for the stalls and as I love any excuse to bake, I've tried something new.

White Chocolate Rocky Road


Super quick to make, and in fact, no actual baking required.


You just melt the white chocolate (in a heat proof bowl over simmering water).
Once the chocolate has melted, take it off the heat and add the marshmallows, dried fruit, pistachio nuts if you like... pour it all in an oven dish lined with grease-proof-paper and let it set/cool for a good few hours.
I stuck mine in the fridge, once it had cooled to speed up the process.


Here are the ingredients:

800g White Chocolate (chopped)
2 1/2 cups of Mini Marshmallows (pink and white)
1/2 cup Dried Apples
1 3/4 cups of Dried Cranberries
1 Cup of Freeze Dried Strawberries (difficult to find, so any other "RED" dried fruit would do)
Add some Pistachio nuts too if you like.


Once totally cooled and hardened, remove from the baking trey and chop the Rocky Road into squares or rectangles.

Voila'.

Done... ready for the Christmas Fair!!!


Recipe adapted from Technicolor Kitchen

Sunday 4 December 2011

Keeping warm

As the limit of my crochet capacities seem to lie in the blankets department, recently I have felt like trying something new... something wearable.

Lovely Crochet Cardigan


So I found this pattern for a little crochet cardigan (crochetted all as one piece - apart from the arms -  which is fab and easy) and I have since made three cardies for Nina.
One turquoise, one forest green and have just started an orangy one...


This pattern is for a baby cardi, but for the first one I used a larger hook (5mm), and double knit wool, which made the cardi slightly bigger. The second one (which Nina is wearing in the photo) I made with a hook size 3mm and 4ply wool, which made the whole thing smaller and tighter... with the orange one I am using a 4mm hook and double knit wool, which I think may make the cardi somewhere in between the two...
If you are feeling brave, you can adapt the pattern to make the cardi bigger or smaller.
I have yet to explore...

Just so you know:

CH = Chain
U.S. SC = Single Crochet (UK Double Crochet)
U.S. DC = Double Crochet (UK Treble)
U.S. HDC = Half Double Crochet (UK Half Treble)
SS = Slip Stitch
V-Stitch = DC 1, CH 1, DC 1
Cluster Stitch = DC 3

Here is how to make your own baby cardi:

YOKE

Chain 43. Turn.

Round 1: Single crochet (sc) in second chain (ch) from hook and in each ch across. (42 sc). Ch 2, turn.

Round 2: Half double crochet (hdc) in first 2 sc, 2hdc in next sc (increase made). *Hdc in next 3 sc. 2 hdc in next sc.** Repeat from * to ** until last sc. Ch 2, turn. (52 hdc)

Round 3: Hdc in each hdc across. Ch 2, turn. (52 hdc)

Round 4: Hdc in next 3 hdc, 2hdc in next hdc. *Hdc in next 4 hdc, 2hdc in next hdc.** Repeat from * to ** utnil last sc. Ch 2, turn. (62 hdc)

Round 5: Hdc in each hdc across. Ch 2, turn. (62 hdc)

Round 6: HDC in next 4 hdc, 2hdc in next hdc. *Hdc in next 5 hdc, 2 hdc in next hdc.** .** Repeat from * to ** until last sc. Ch 2, turn. (72 hdc)

Round 7: Hdc in each hdc across. Ch 2, turn. (72 hdc)

Round 8: HDC in next 5 hdc, 2hdc in next hdc. *Hdc in next 6 hdc, 2 hdc in next hdc.** .** Repeat from * to ** until last sc. Ch 2, turn. (82 hdc)

Round 9: Hdc in each hdc across. Ch 2, turn. (82 hdc)

Round 10: HDC in next 6 hdc, 2hdc in next hdc. *Hdc in next 7 hdc, 2 hdc in next hdc.** .** Repeat from * to ** until last sc. Ch 2, turn. (92 hdc)

Round 11: Hdc in each hdc across. Ch 2, turn. (92 hdc)

Round 12: Hdc in next 7 hdc, 2hdc in next hdc. *Hdc in next 8 hdc, 2 hdc in next hdc.** .** Repeat from * to ** t last sc. Ch 2, turn. (102 hdc)

BODY 
(forming armholes): note that the beginning chain counts as the first stitch on these rows

Round 13: Hdc in first 7 hdc, 2 hdc in next hdc, hdc in next 7 hdc. Chain 7. Skip next 19 hdc, Hdc in next 10 hdc, 2 hdc in next hdc, hdc in next 10 hdc, 2 hdc in next hdc, hdc in next 10 hdc. Chain 7. Skip next 19 hdc. Hdc in next 7 hdc, 2 hdc in next hdc, Hdc in next 8 hdc. Turn.

Round 14 (v-stitch round): Chain 3. Dc in next hdc, *sk next 2 hdc, v stitch in next hdc** repeat from * to ** 3 more times. Skip the next hdc, v-stitch in 1st chain stitch of right armhole, sk 2 ch, v-stitch in next ch, sk 2 ch, v-stitch in next ch, *sk next 2 hdc, v-stitch in next hdc**. Repeat from * to ** 9 more times. Sk next 3 hdc, v-stitch in 1st chain stitch of left armhole, sk 2 ch, v-stitch in next ch, sk 2 ch, v-stitch in next ch, *sk next 2 hdc, v-stitch in next hdc**. Repeat from * to ** 3 more times. Skip next 2 hdc and dc in next 2 hdc. Turn.

Round 15 (cluster round): Chain 3. Dc in next dc, *cluster in ch-1 space of the next v-stitch**. Repeat from * to ** around. Dc in the last two dc. Turn.

Repeat round 14, v-stitch (v-stitch in the middle dc of each cluster stitch) and round 15, cluster stitches (cluster stitch in the ch-1 space of each v-stitch) five more times for a total of twelve lace rows. Do not fasten off.
EDGING


Ch 1 and sc up left front working in ends of rounds. Ch 1 and turn. Sc in each sc down left front, making 4 button holes spaced evenly down the yoke (the hdc stitches). (To make buttonholes: from the top, sc 2, ch 2 and sk the next 2 sc. I then worked 5 sc to the next buttonhole and so on.) Ch 1 and turn. Sc in each sc and chain stitch up the front of the left front. Do not turn. Ch 1 and sc in each stitch along the neck. Ch 1 and sc down the right front working in the ends of the rounds. Ch 1 and turn, sc in each sc up the right front. Ch 1 and turn, sc in each sc down the right front. Ch 1 and work picot edging along the bottom as follows: *sc 3, picot** repeat from * to ** around finishing with sc in the last 3 stitches.

Fasten off.
SLEEVES 
 

16 rows… 30 stitches to 18 stitches

Attach yarn to underarm. Work 30 hdc around and join with a sl st. Do not turn, but instead continue to work in the round. Ch 2, work 1 hdc in the same stitch and then 1 hdc in each hdc around. Work a total of 4 rows from the join and work a decrease by skipping the first hdc (the one in the same space as the chain) (29 hdc). Work 12 more rows decreasing 1 hdc at the beginning of each round for a total of 16 rows and and final round of 18 hdc. Fasten off.

Repeat for second sleeve.

Weave in ends.

Sew on 4 buttons on the right edging opposite the buttonholes


Any questions about how to make this cardigan... just post a comment and I'll do my best to explain it to you.

Happy crochetting!!!

Thursday 1 December 2011

Two Tops or not Two Tops

On this extremely rainy Thursday, I'm sitting at home, lights on (as it's just so dark, even though it's only 9am), wondering what to do for the day, with an almost 3 month old baby?

Nina is happily kicking her legs and stretching her arms under her wooden-toy-arch (not sure what the exact technical terminology for this particular baby game is), as I type away at my (broken) computer.

  So... looking at the photos I have taken, of various projects I have invested my time into, I leave the world of little dresses behind, and bring you tops this time.
Two of them...

Here they are:

The Toowit-Toohoo Top


and

The Flutter-by Top


To this top I also added an applique butterfly, which I hand stitched after ironing it on with some Bondaweb backing.


I just LOVE bias binding!
It's my best friend at the moment... makes everything look "finished off".
I went online (try Sew Essentials) and bought various rolls of bias binding in different colours, not cheap, but it really does go a long way.

Fun
Adorable
And so versatile...